
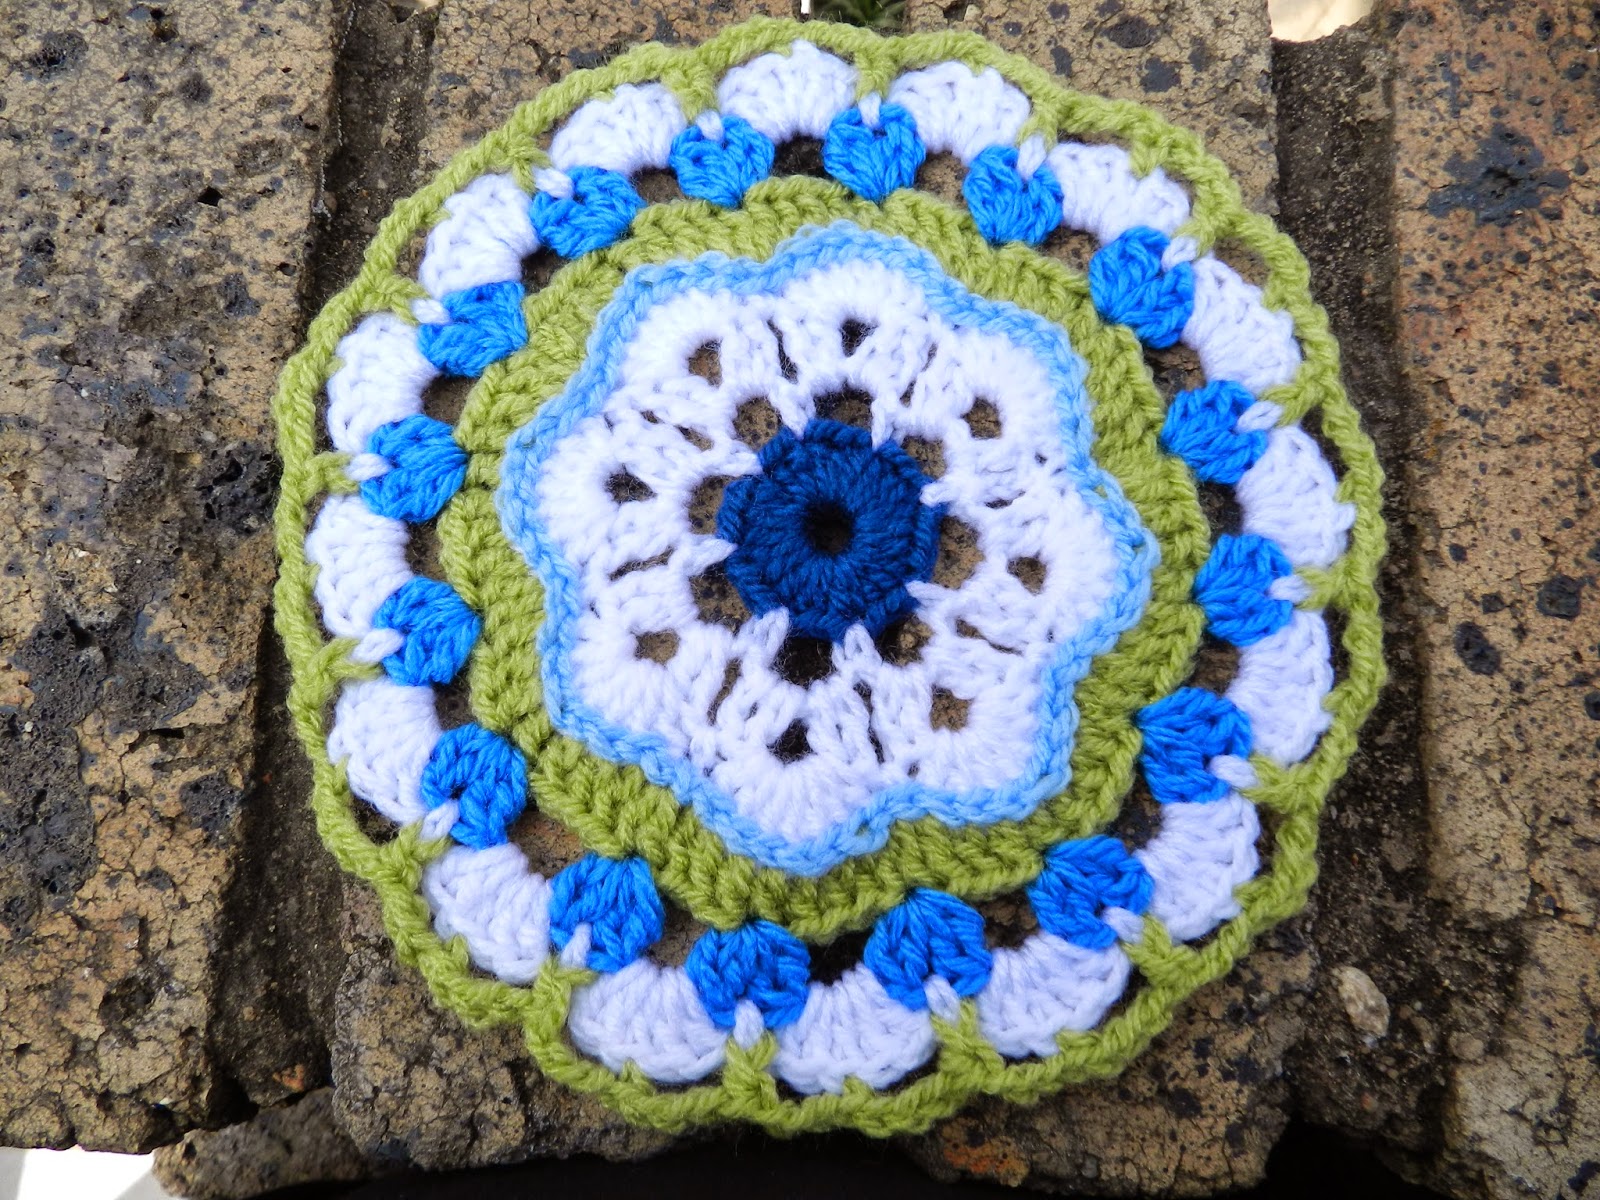
First Ta-dah moment : Maybelle Flower Mandala Pattern

I am beyond excited ..... I am posting a pattern of my own creation! What a feeling .. I am nervous and anxious, but also almost jumping for joy, and most of all so proud that I have achieved this level of confidence to have fellow crochet friends actually reading and perhaps trying my pattern, thank you ♥Pattern terms: US (find UK terms here)
Hook: 4.00mm
Yarn: Elle Family Knit Double Knit
and a nice big eyed darner and scissors
Stitches used: Sl st ~ slip stitch; sc ~ single crochet; hdc ~ half double crochet
dc ~ double crochet; Fp sc ~ front post single crochet; Fp hdc ~ front post half double crochet; Fp dc ~ front post double crochet; and Double 2dc cluster
Notes:
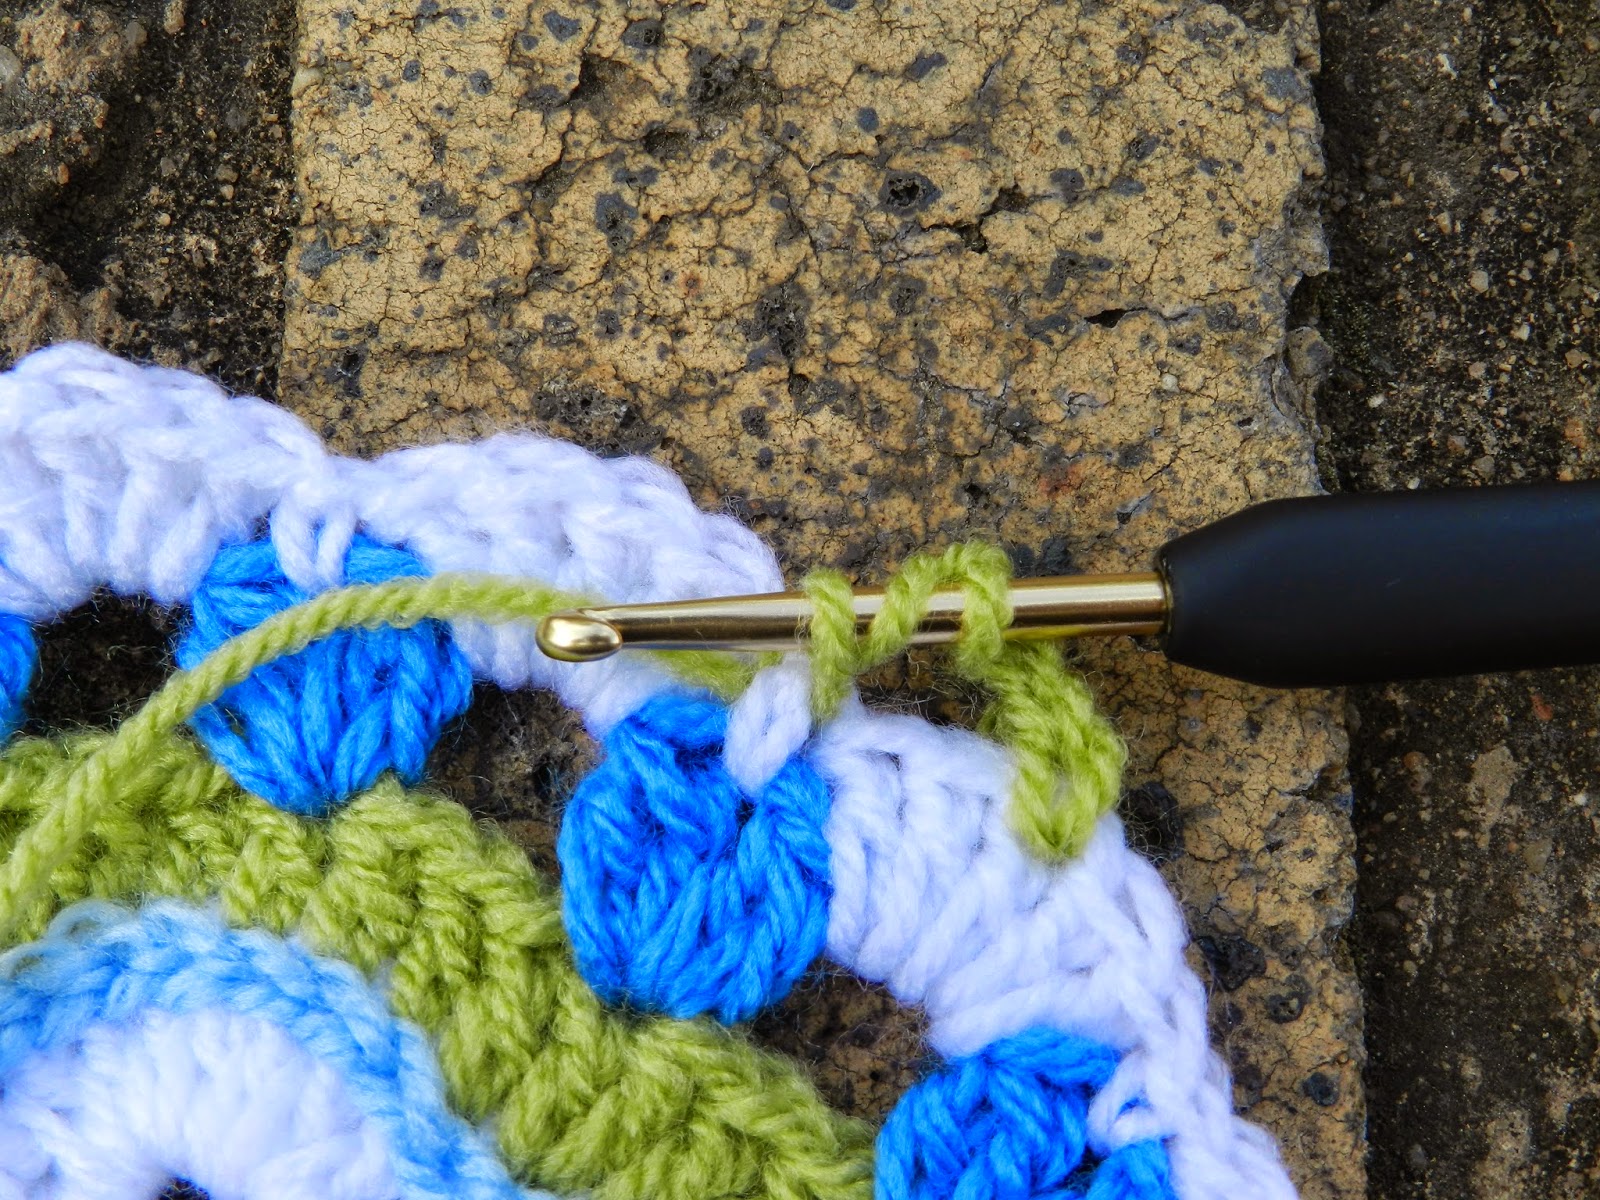
☻To make a Double 2 dc cluster:
*Yarn over hook, insert hook in next stitch, yarn over hook, draw yarn through the stitch, yarn over hook, draw through 2 loops on hook, leaving 2 loops on hook. Yarn over hook, insert hook into same stitch, yarn over hook, draw yarn through stitch – 4 loops on hook, yarn over hook, draw through 2 loops on hook, yarn over hook, draw through last 3 loops** Chain 1, and repeat from * through to ** in same stitch – thus making a double 2 dc cluster in same stitch. Here is a small picture to show how it looks completed.

Double 2 dc cluster
☻ This lovely site has really good photos showing how to close rows of rounds of any stitch. I prefer this method, it is neat. Her blog is full of great patterns too! Her colour combos are inspiring!
☻Foundation row can be made with either the method as described in the Maybelle Flower pattern or with a Magic Circle, link for Magic Circle is here
☻Standing double crochet link can be found here
☻Standing half double crochet link can be found here
☻Standing single crochet link can be found here
The Maybelle flower centre is on this site. Follow pattern, working 23hdc into circle (instead of 23dc) as in pattern. That gives us a stitch count of 24hdc including the 2ch ~ I wanted a smaller circle to start the flower. Proceed with Rows 2 - Row 4 as per pattern. (16 petals)

The following rows form my pattern:
Row 5: Attach yarn to any dc, sl st into each dc stitch through both loops quite loosely, this just forms a sl st border to the flower and you don't want the petals to pucker; work around flower, join to first sl st to end row.
Row 5


Row 6: For this row, you will be working into the loops behind the sl sts. Attach yarn into loops of dc at centre of ‘valley’ between the petals, chain 3 (or start with a standing dc), add a second dc into same space, dc into next 7dc back loops, 2dc into back loops of next dc, dc into next 7dc, proceed around circle and join to top of 3ch or to top of standing chain to end the row.
Row 6


Double loops behind slip stitch row


Row 7


Row 8: Attach yarn to any 1 ch space, 1 ch (stands as first sc), 5 dc into following 2 ch space ~ making a 5dc shell; *1 sc into 1 chain space, 5 dc into 2ch space** Continue in pattern between * and ** to the end of row and join to 1 ch at start. 16 shells or wedges
Row 8


Row 9: Attach yarn to centre dc of shell, chain 4 (1 ch to stand as starting sc and a 3 ch loop), 1Fp hdc around post of sc (as show in picture) chain 3, 1 sc into centre dc of shell, chain 3, 1Fp hdc around post of sc, chain 3, 1 sc into centre dc of shell , continue in pattern, end by joining row to beginning 1ch.
Row 9


sl st into top of 2 chain or standing hdc.


Row 11: Now for the final row, find the space just before Fp hdc of previous row, as indicated in picture, and attach yarn; chain 3 or start with standing dc; add two more dc into same space; 1 Fp dc around Fp hdc, find space just after Fp hdc and work 3 dc into the space; skip 3 dc, 1 Fp sc around Fp hdc on previous round, continue in pattern. To finish sl st into top ch of 3ch or top of standing dc to join row ~ 16 shells.
Row 11


Ta Daah!
~ and there we have it! I will beg your forgiveness in advance for: a) my long winded explanations and b) any glaring mistakes ~ this being my very first attempt at putting a pattern into script! Please feel free to leave a comment if any such gremlins crop up!
Pretty in pink
-W.jpg)
I added another row to the next mandala I made, and I quite like how it looks ~

~ a row of slip stitches into the loops of the last row, in the same way as we did in Row 5!
Where I have indicated links, please explore these wonderful sites .. a goldmine of good patterns, and tutorials with clear photos ... I find photos essential when learning something new!
Watch this space for my Sunshine Mandala, based on this pattern but increased in size by another 6 rows!
Pat xx

The mandala creations that I'm seeing in blogland at the moment just keep getting better and prettier, and your creation is one of these! It's gorgeous, thanks so much for sharing this. It's definitely on my 'to do' list. All your hard work is very much apreciated...well done!! X
ReplyDeleteThank you Amanda, yes indeed, I agree there are some truly superb creations out in Bloggieland at the moment, a virtual visual feast! Pat xx
ReplyDeleteOh I love this, will definitely try it. Thanks for sharing it. I love the orange and blue version. Love your log and many thanks for your visit and kind words.
ReplyDeleteThese are beautiful. Thanks for sharing your pattern.
ReplyDeleteMarianne x
My pleasure!
DeleteOoh, your Maybelle Flower is beautiful Pat ...so pretty...and very clear instructions too..enjoy your Ta-dah moment....you deserve it!....x
ReplyDeleteHope you have a happy new week!
Susan x
Aaww .. thanks Susan xx
Deletewell done mom!
ReplyDelete(:
Love you son
Deletexxx
Congrats on making your own pattern. It's really beautiful, and the photo tutorial is great too!
ReplyDeleteMany thanks for your kind comment Olga
DeletePat xx
Its so pretty Pat, such carefully neat work, and I really love the colours you used.
ReplyDeleteKate x
Thank you Kate, your kind words are good for the soul!
DeletePat xx
WOW!! Your mandala looks lovely Pat! If only I hadn't already made one for Yarndale already...
ReplyDeleteI'll have to think of another use for them won't I?!
Thankyou for sharing.
Best wishes
Tina :-)
Thank you Tina, and yes I think there will be many mandala mad hookers out there who have 'contemporary doilies' everywhere! Lots of colour to gladden the heart :)
DeleteWill look out for your contribution to Yarndale on the Pinterest site! :) Pat x
Fabulous mandala pattern. Especially love the green blue white combo. Must try it out!
ReplyDeleteI have just made your lovely mandala, lovely pattern and easy to follow, thank you for sharing you can find it here.http://lindacraftycorner.blogspot.co.uk/2014/06/sunday-smiles.html
ReplyDeleteHow completely chuffed am I this morning!!!!!! Thank you for trying my pattern and bigger thank you for letting me know .. it looks stunning in your colours :-) Pat xx
DeleteOoooh I just have to come back here, I am following you now. I am trying to get back into crochet after a very long absence. This may be just the thing to inspire me
ReplyDeleteJanice
So lovely to hear from you Janice! Please post a pic of your project on my FB page (of the same name) when you are done ... there is no bigger thrill than seeing someone else's interpretation of a pattern .... Pat xx:)
DeleteI was looking for a maybelle blanket and then I saw your mandala. I was realized I have to try it. Thanks for the pattern and the idea!
ReplyDeleteDorka from Hungary
Hello and welcome Dorka! Hope you like making the mandala!
DeleteQue belleza. Gracias por el patron
ReplyDeleteIt is really gorgeous! I love your colors.
ReplyDelete¡Me encanta!
ReplyDelete